Work a job, step by step
Open a job by tapping its card on the Jobs screen. The app walks you through one step at a time and only shows what's due now. You don't have to remember the order.
The example on this page is a delivery (Place): job JP-2026-0151, a 30 yard container for Bluff City Construction. A pickup that goes to the dump comes after it. Job types and their steps shows which steps each kind of job has.
Find your way around a job
The dark header shows the job type, the customer, the address and the container size. Under it:
- Step 2 of 6 and the step's name: where you are.
- Next: what comes after it.
- The bar: one segment per step, with the current step in red.
Tap the step name to see every step in the job. Notes from dispatch, when the office has left any (gate codes, where to put the container, who to ask for), sit just below the header on every step.
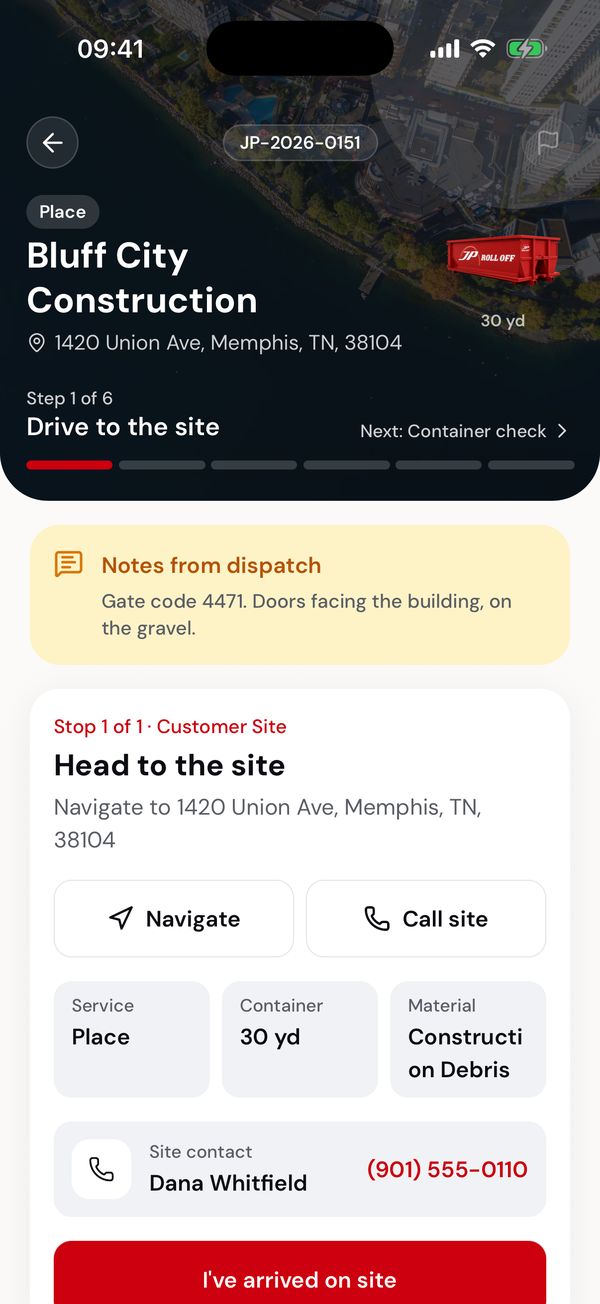
Step 1: head to the site. Gate code and placement notes from dispatch are at the top.
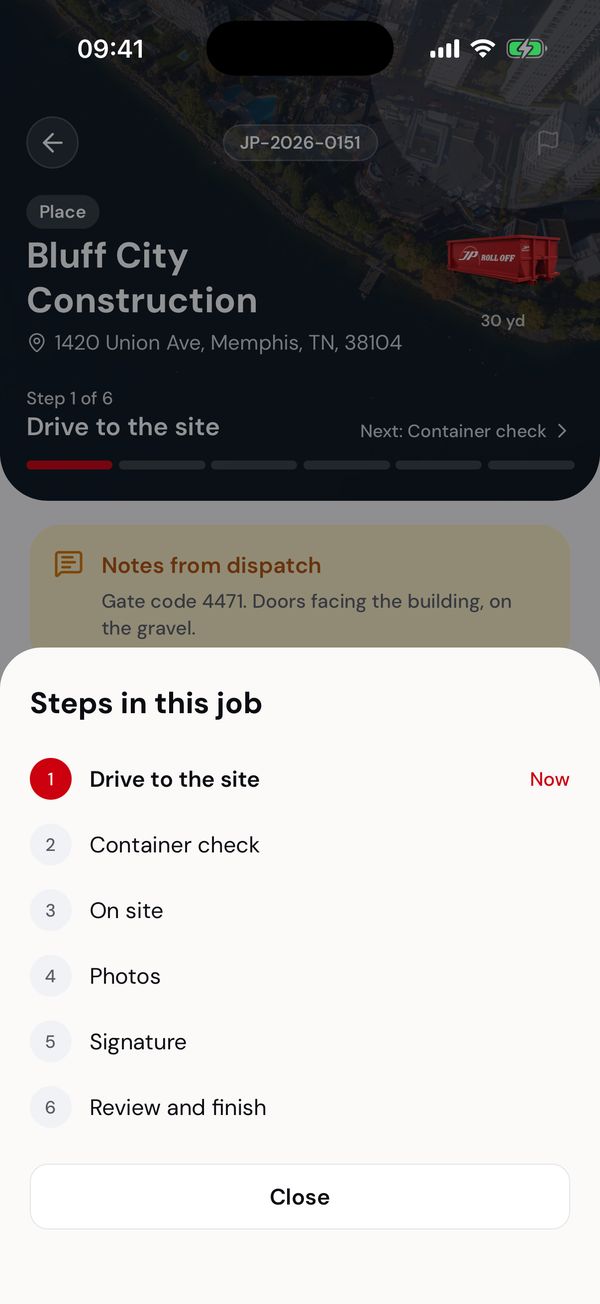
Tap the step name to see all the steps.
1. Drive to the site
The first step shows the address, the service, the container size, the material and the site contact.
- Navigate opens your maps app with the address.
- Call site phones the site contact.
- I've arrived on site records your arrival. Tap it when you're at the site, not before.
:::tip Navigate tells the customer you're on the way The first time you tap Navigate on a job, the app tells the customer "Your driver is on the way" and moves the job to In progress, so the office can see you've set off. You don't need to call or text them.
If you know the way and skip Navigate, tapping I've arrived on site still moves the job on. The customer just doesn't get the "on the way" message. :::
2. Container check
Before anything is set down or hooked, confirm which container you have. It's the last moment a wrong container is easy to fix.
When dispatch assigned a container, its number is shown large, like the plate on the container. Check it against the container itself.
- It's the right container moves on.
- I picked up a different container lets you type the number of the one you actually have.
When dispatch didn't assign one, the step asks you to type the number from the container. Tap Save container number.
The app checks the number as you save it. It refuses a container that's on another job, or that isn't the size the customer ordered, and the message says which. If you can't read the number at all, tap Can't read the number? and call dispatch.
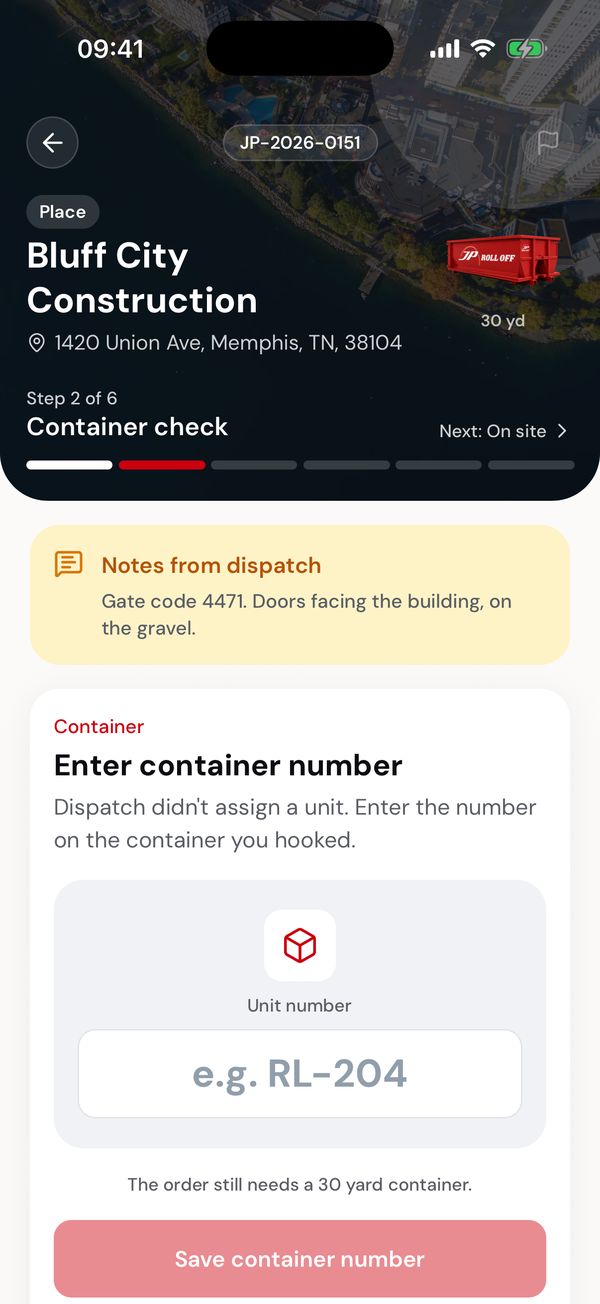
No container assigned: type the number off the container.
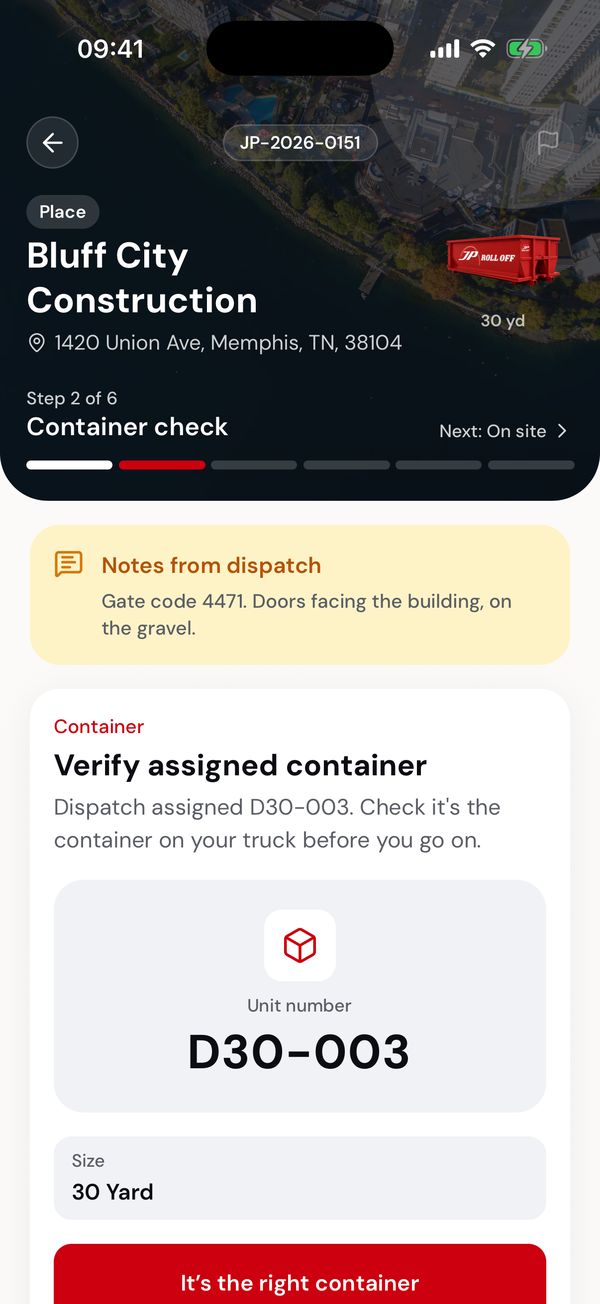
A container assigned: check the number matches.
3. On site: the safety checklist
Before you set the container down, tick all three:
- Ground is level and stable
- Access is wide enough for truck
- Customer confirmed placement location
The site contact is here too, if you need to call them. Tap Placement confirmed when all three are ticked.
4. Photos
Take four photos: Front, Back, Side (showing where it's placed) and Inside (the load, from above). Tap a square to open the camera. Each photo uploads as soon as you take it and gets a green tick.
The counter shows how many are left. When all four are done, tap Continue to signature.
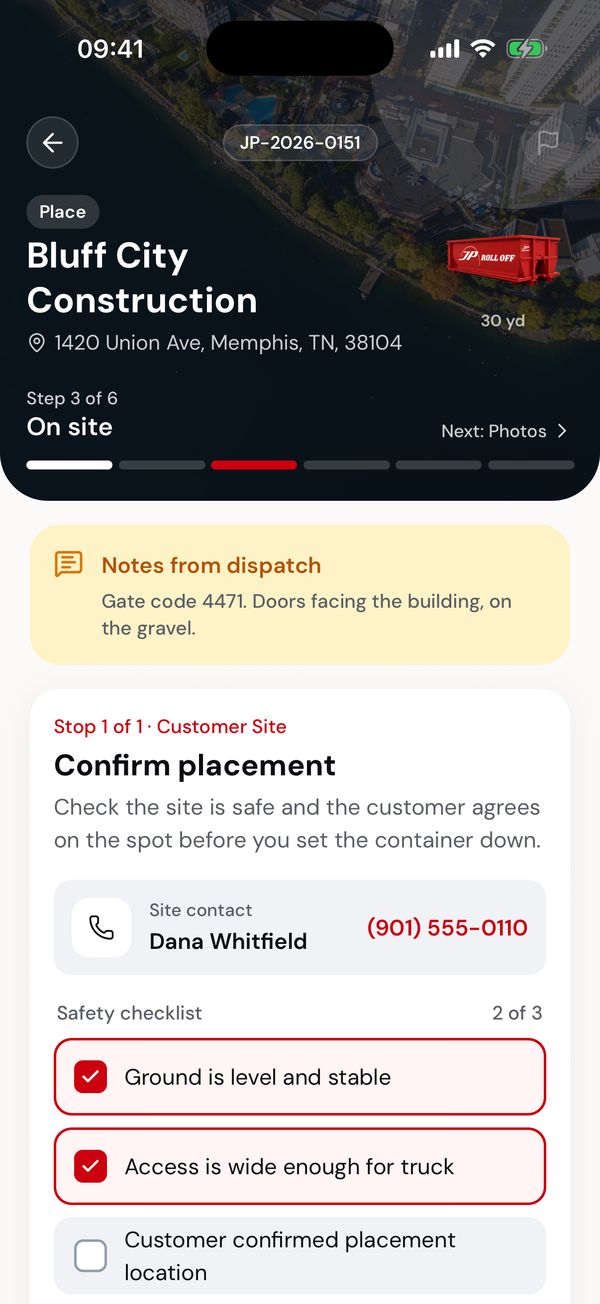
Tick all three checks before setting the container down.
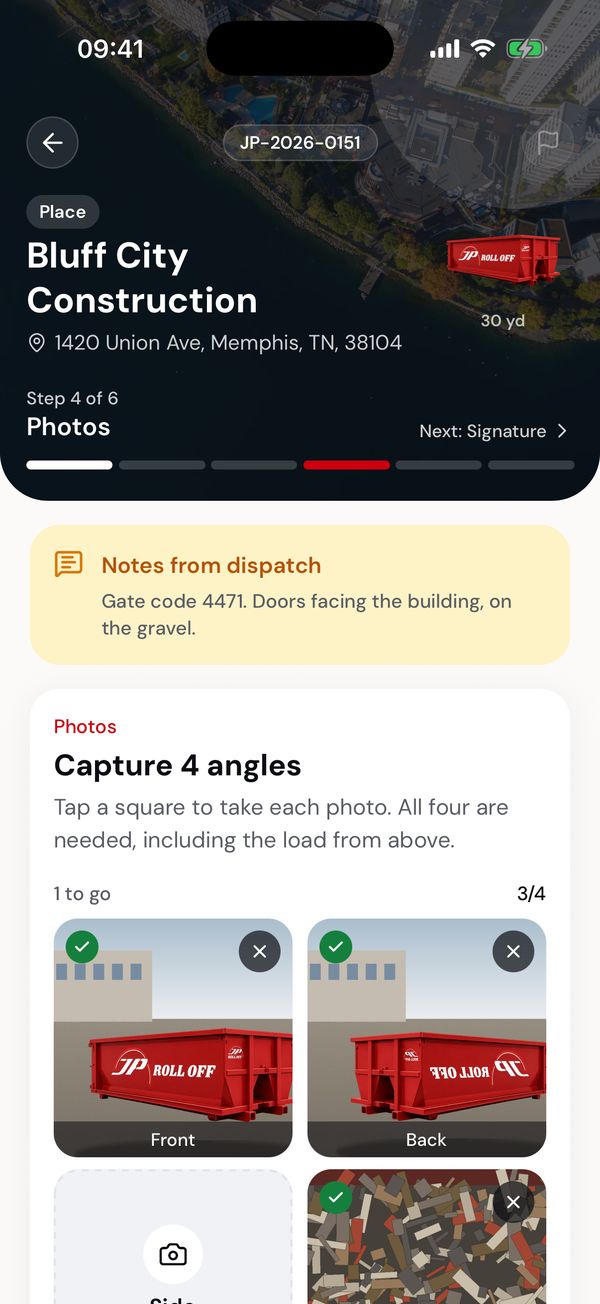
Three photos done, one to go.
5. Signature
Ask the customer, or whoever is on site, to sign.
- Tap the signature box. A full-screen pad opens so they can sign comfortably.
- Type their name under Printed name.
- Tap Review & submit.
If nobody is there, turn on No one on site instead. The signature is skipped and the job records that nobody was available.
Submitting the signature is also how you leave the site: there's no separate button to tap. The customer is told straight away, for example "Dumpster delivered" with the date the rental runs until.
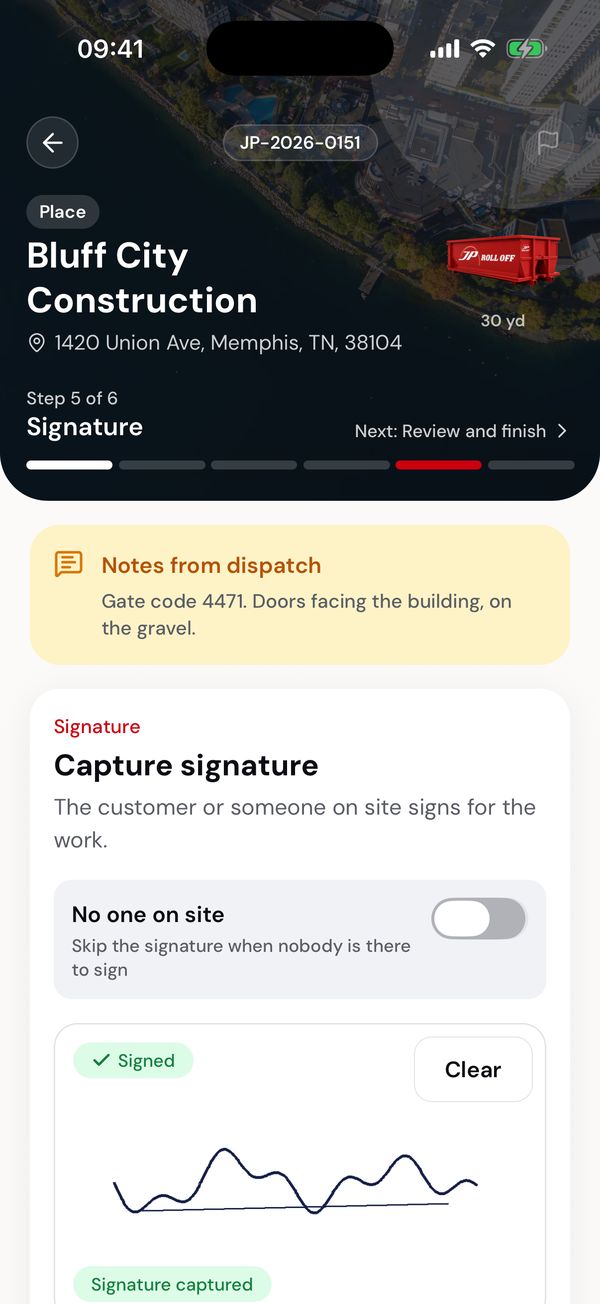
A signature captured.
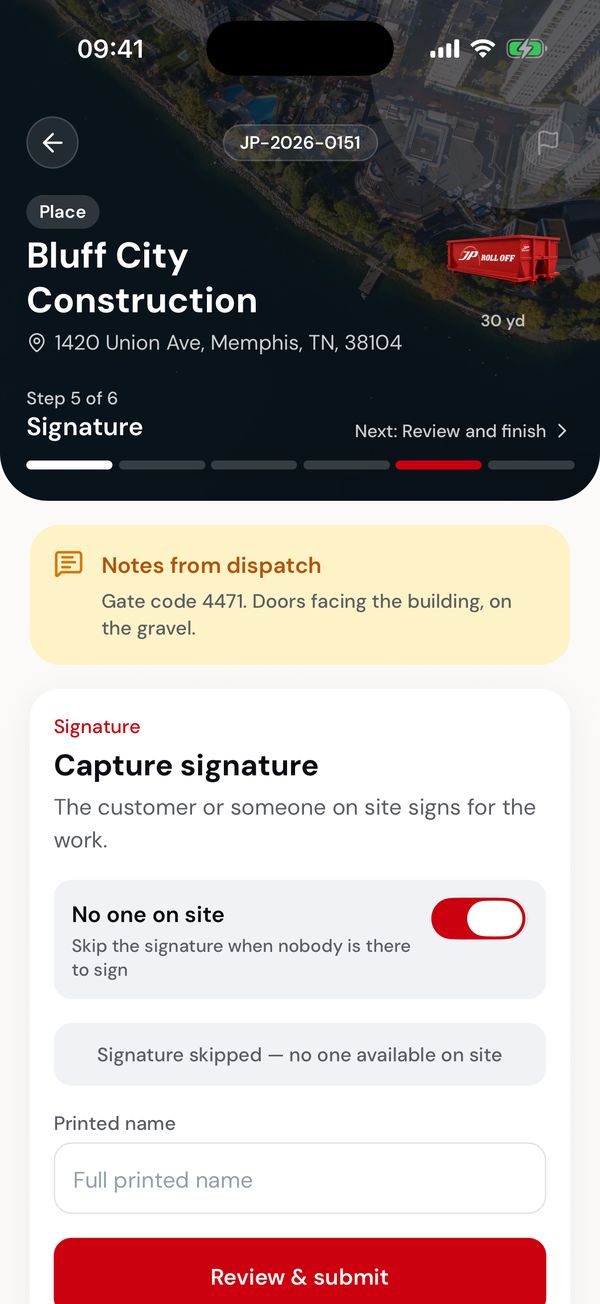
Nobody there? Turn on No one on site.
6. Review and finish
The last step lists what the job has on record: customer, container, photos, the weight ticket (when the job needed one) and the signature. When everything has a green tick, tap Submit & complete job.
The customer gets an "Order complete" email, and the office sees "Job completed". Then you see Job complete, with what you captured. Back to my route returns you to the Jobs screen.
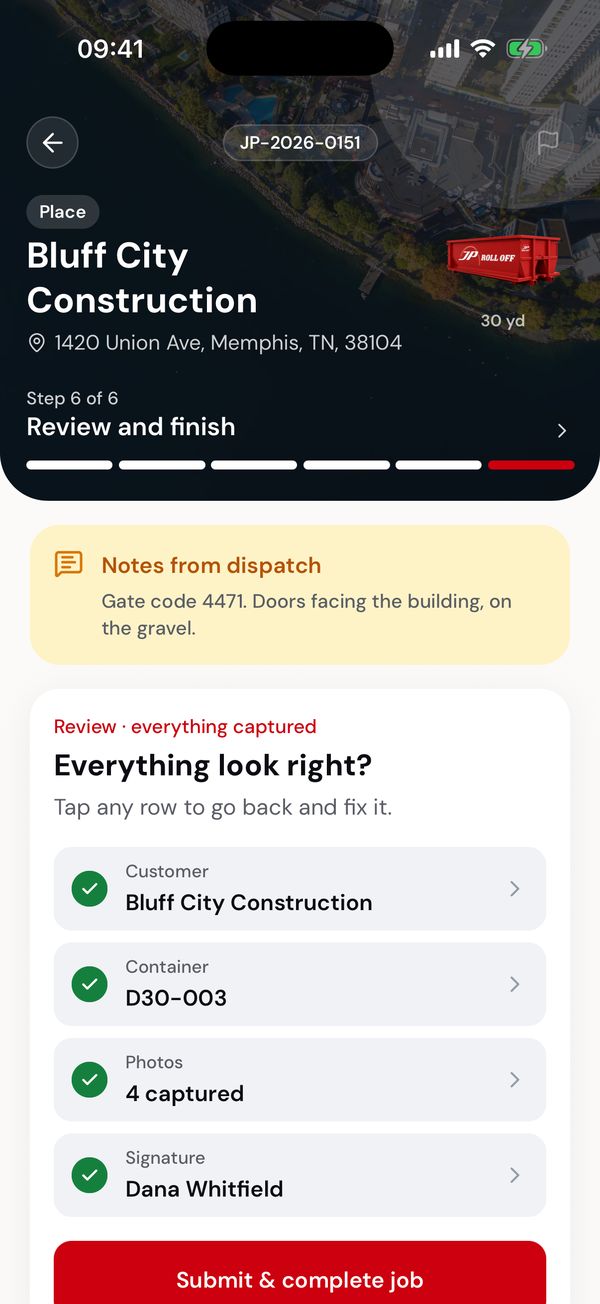
Everything captured: submit and complete.
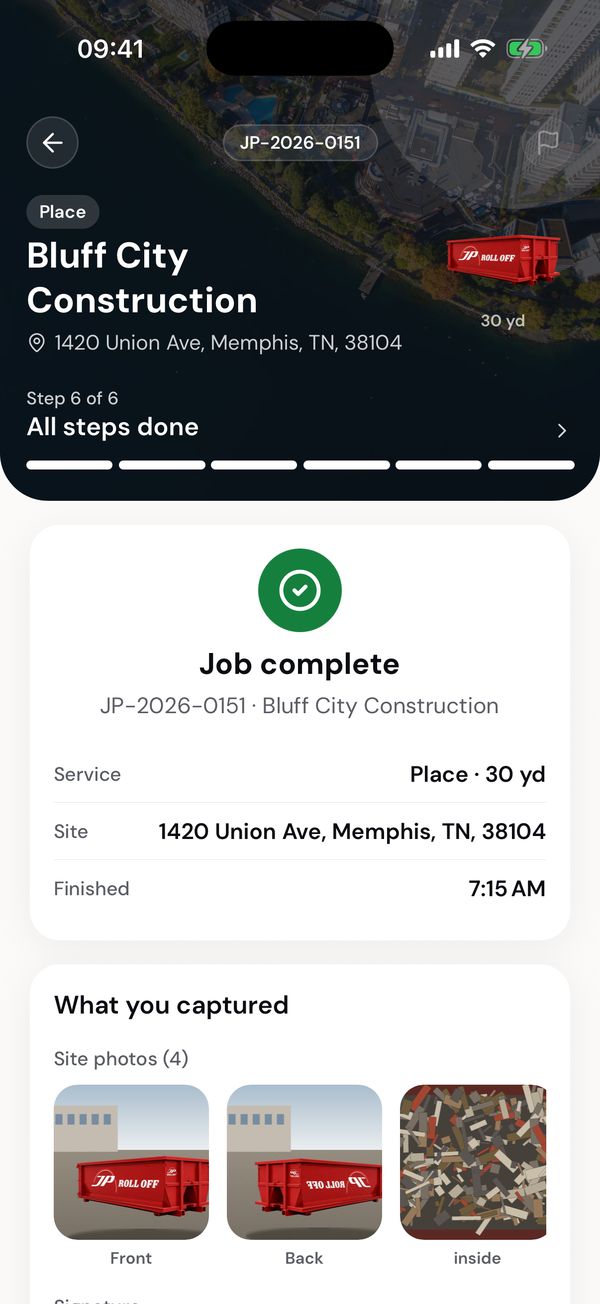
Done. The job moves to the Done tab.
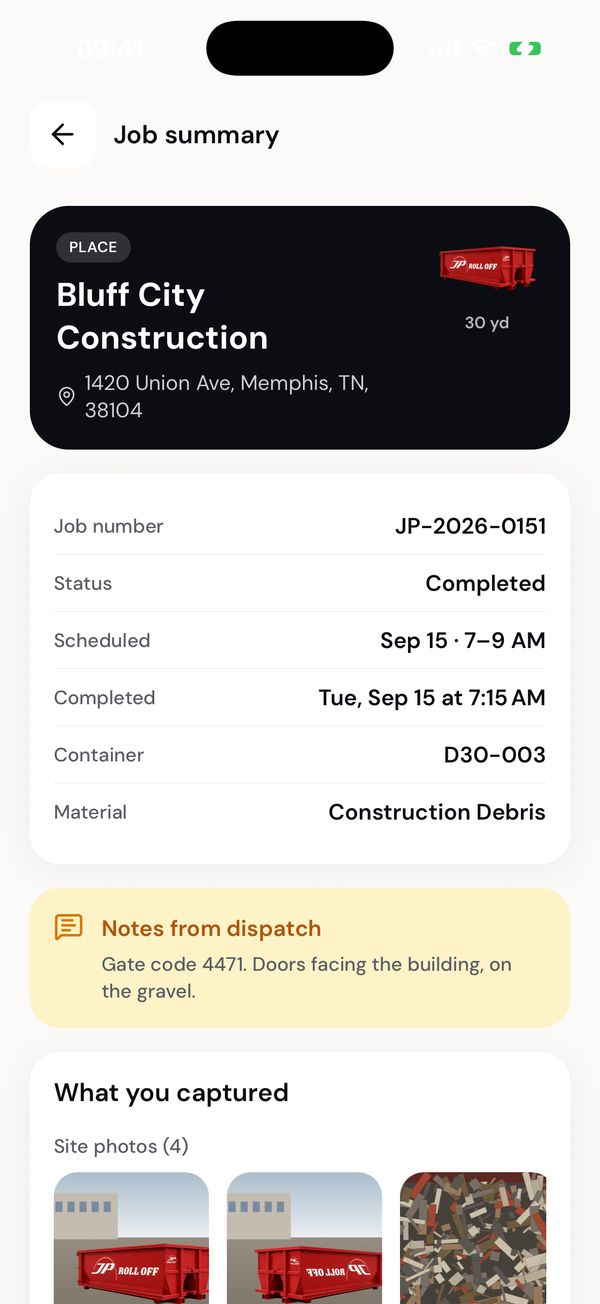
Open a finished job later to see its summary and what you captured.
Jobs that go to the dump
Pickups, swaps and live loads carry on to a dump site after the customer's site. The example is job JP-2026-0153: a 40 yard pickup for Delta Demolition Group, taken to Shelby County Landfill.
Check the container at pickup
On a pickup, the container check at the customer's site is for the full container you're collecting. The number shown is the one dispatch has on file for that site.
Drive to the dump
After the customer's signature, the next step is Drive to Dump Site. Navigate opens the dump's address. Tap I've arrived at Dump Site when you get there. Leaving the customer's site tells the office "Driver heading to dump".
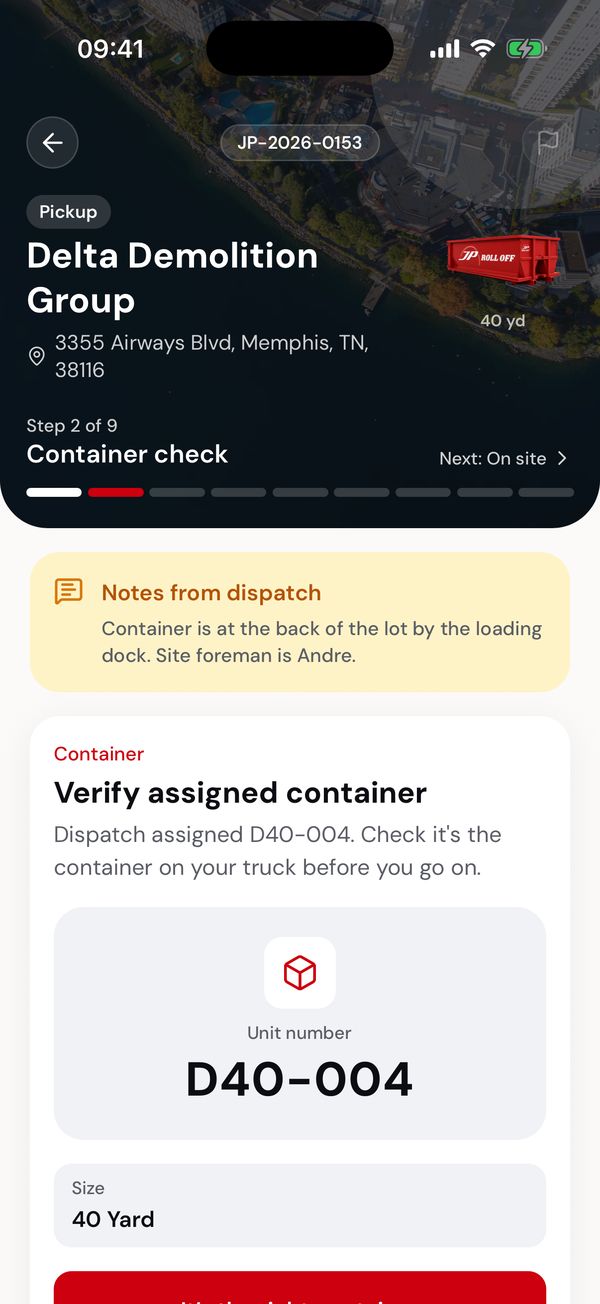
A pickup: check the container you're collecting.
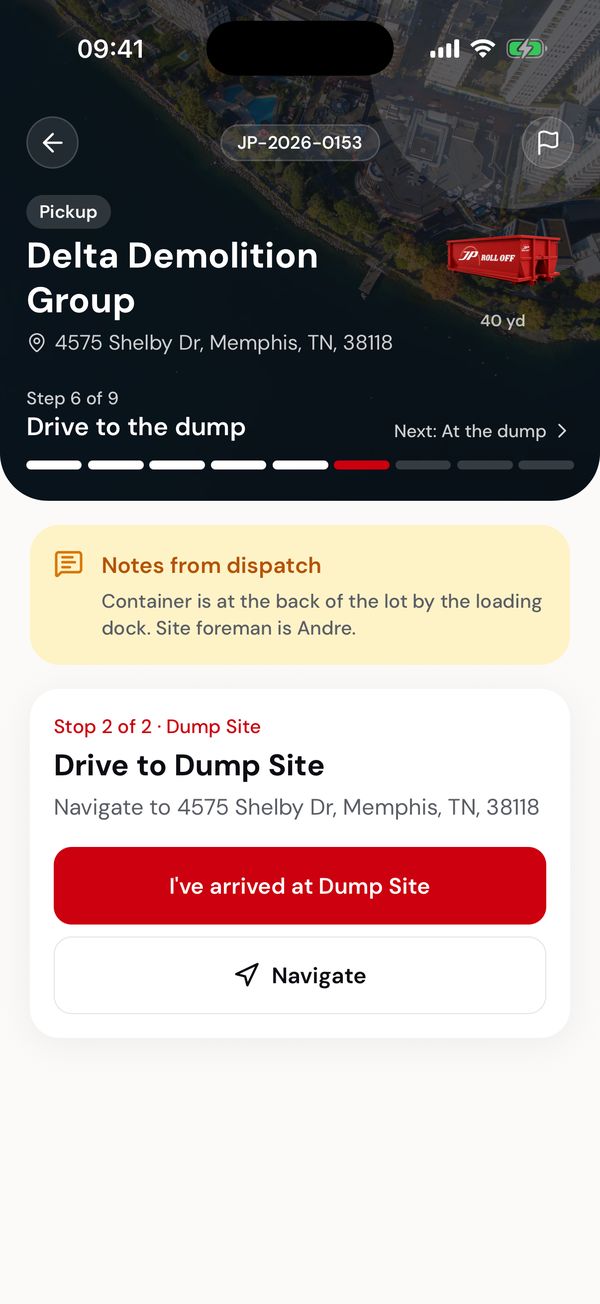
Next stop: the dump.
Weight ticket
When the material needs a weight ticket, the dump stop asks for a photo of it.
- Tap Capture weight ticket and take a photo of the slip from the scale house. Lay it flat so the numbers are readable.
- Tap Review & submit. This also leaves the dump.
No ticket? If the scale house can't give you one, tap Request override, say why, and tap Submit request. The office gets a notification and an email telling them a driver is waiting. While it's pending, the step says so, and you can't complete the job until they answer.
- Approved: you get an Override approved alert and can carry on without a ticket.
- Denied: upload a ticket, or send a new request.
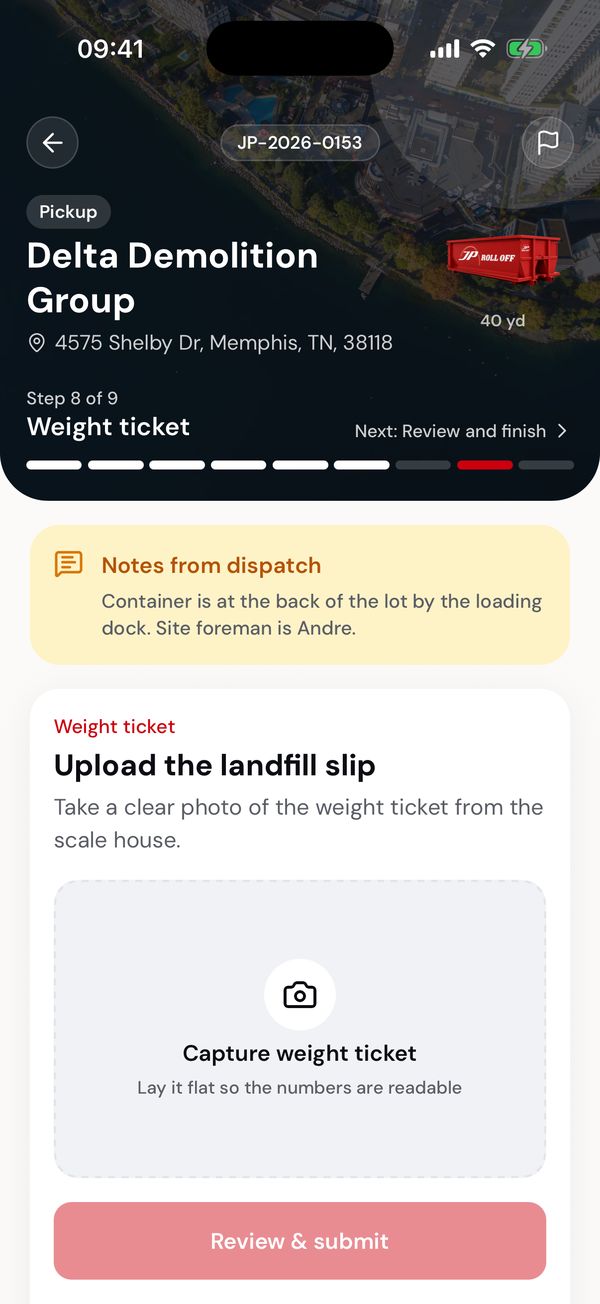
Take a photo of the scale ticket.
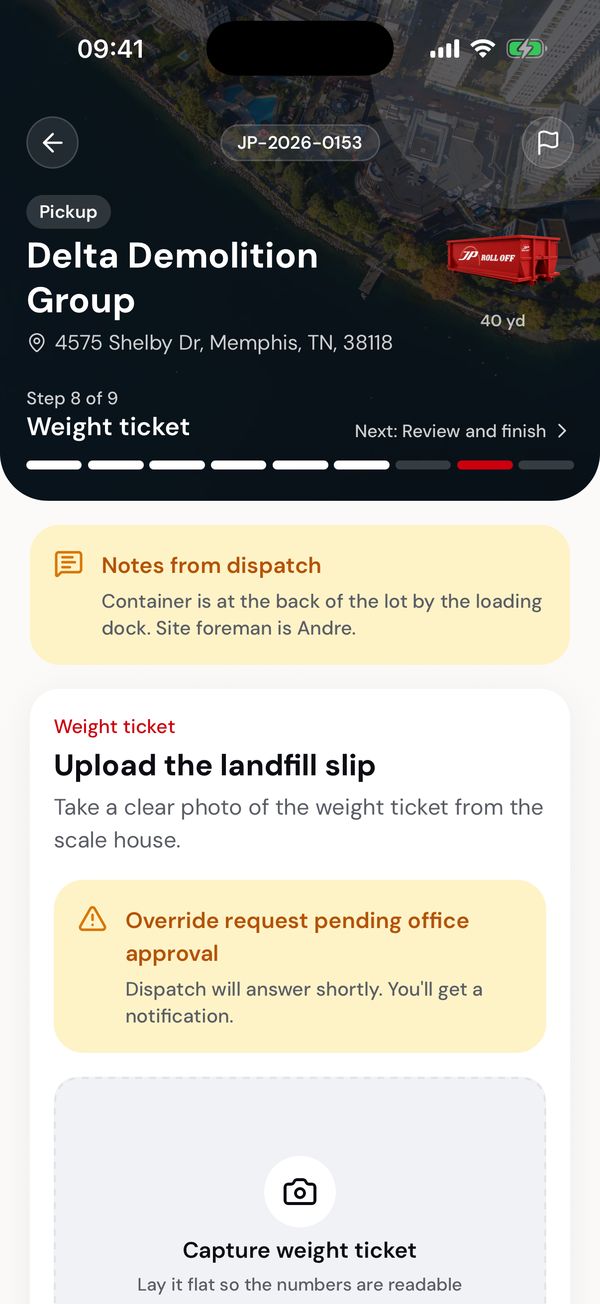
An override waiting on the office.
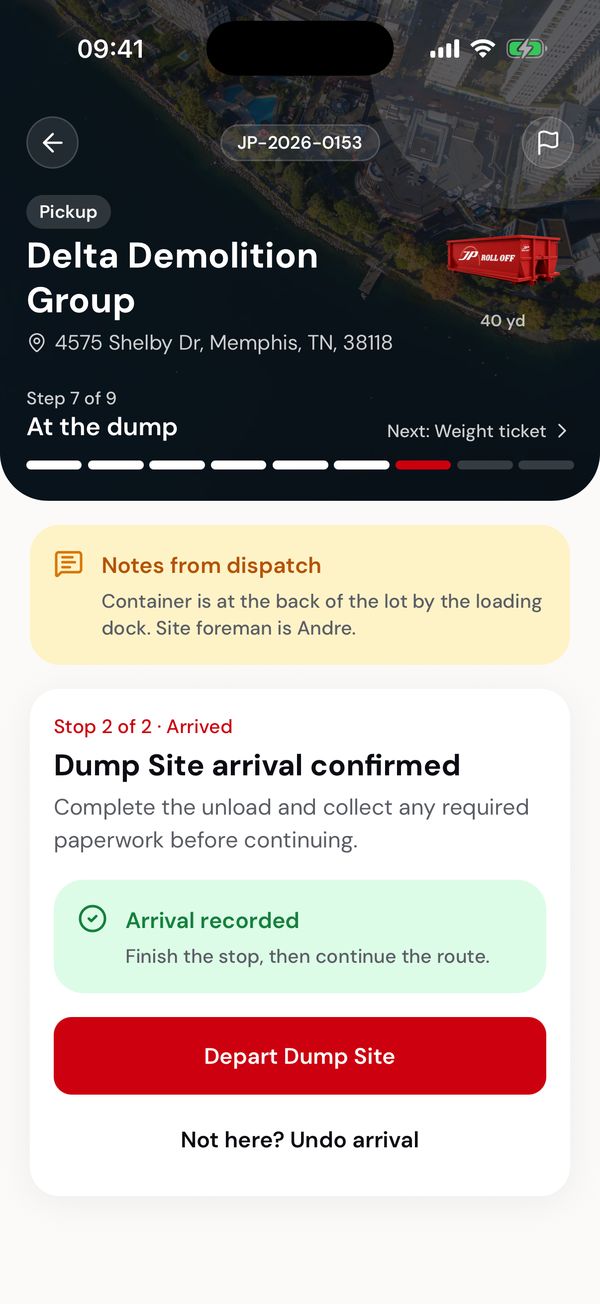
Nothing left to capture at a stop? Tap Depart.
Problem at the dump
If the dump turns you away, tap the flag in the top-right corner of a dump stop. Choose what happened (Wrong material type, Load rejected, Site closed or Other), add a note if it helps, and pick another dump site if you're going somewhere else. Tap Submit report.
The office is told straight away. If you picked another dump site, your route stays on the original one until the office approves the change. When dispatch has dealt with it, you get an Issue resolved alert.
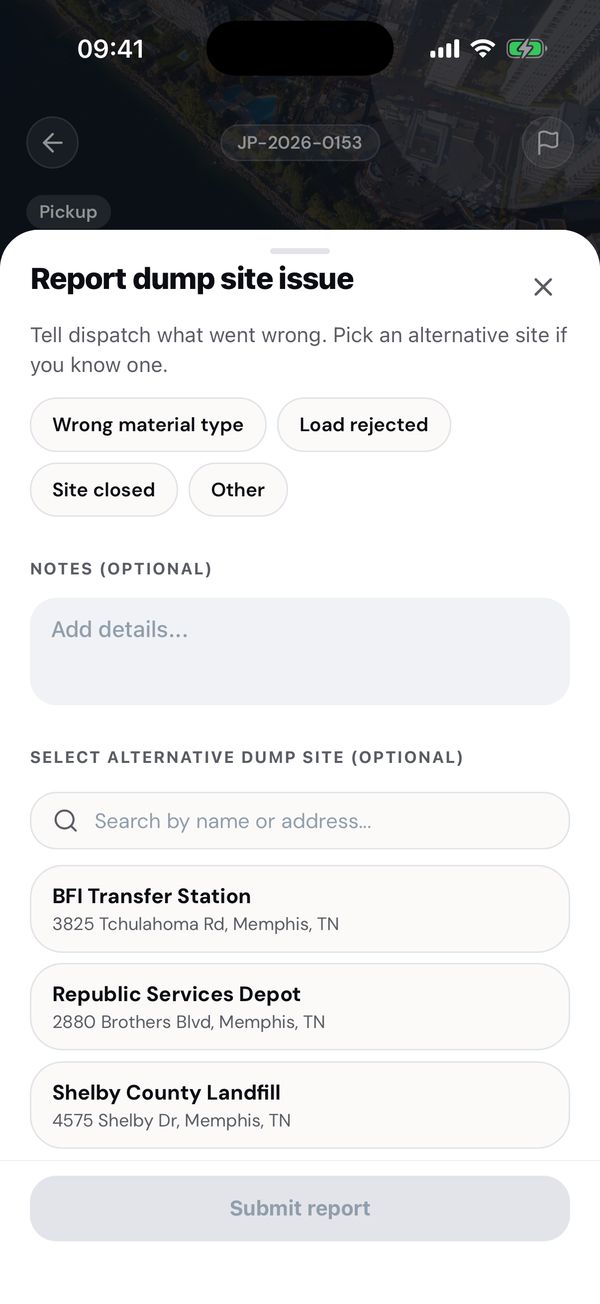
Tell dispatch what went wrong, and where you're taking the load instead.
Can't complete the job
Got to the customer's site and the job can't be done? The gate's locked, a car is parked where the dumpster goes, or it isn't safe. Tap the flag in the top-right corner and choose what's wrong:
- Access blocked
- Spot for the dumpster is blocked
- Customer not ready
- Unsafe to place
- Other
Take at least one photo showing the problem. It's what the office uses to explain any charge to the customer, so get the blocked gate or the parked car in the shot. Add a note if it helps, then tap Send to the office.
You don't set a price. The office decides whether there's a trip charge and tells the customer. They'll call you if they need anything, and they'll tell you what to do with the job.
If the signal drops while you're sending, tap Send to the office again. Photos that already went through aren't sent twice.
Depart, and undoing an arrival
A stop with nothing to capture has a Depart button: tap it as you leave.
Tapped I've arrived at the wrong place? Tap Not here? Undo arrival and confirm. The stop goes back to not arrived. You can only undo an arrival before you've moved on from that stop.
If you leave the app partway through a stop
Photos, weight tickets and signatures are saved the moment you submit them. Three things are kept only on your phone until the stop is finished:
- ticking the container as the right one,
- the safety checklist,
- tapping Continue to signature after the photos.
If the app closes before you leave the stop, you'll be asked for those again. Your photos are still there.